Grant Legassick- Objects In Time

Objects In Time, Photo Object, Year 2

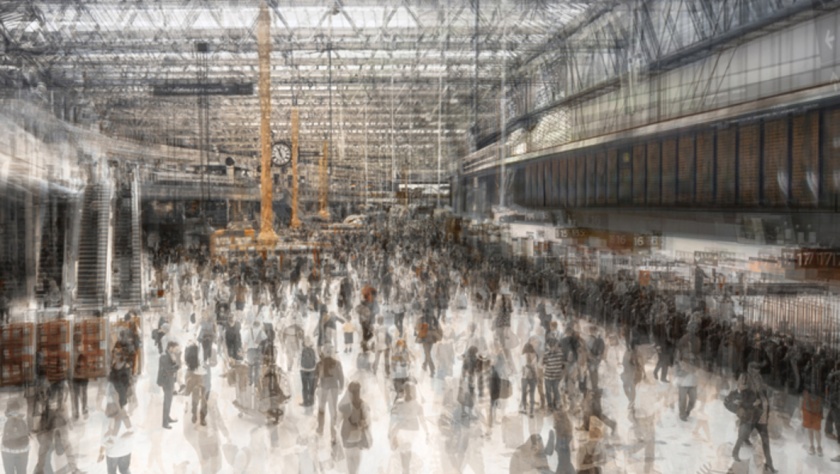
Grant Legassick is a contemporary photographer who first worked as a visual effects artist working under many well known names in the industry such as; Tim Burton and Oliver Stone. Because of Legassick’s background in visual arts, his style of photography   has clear links to his previous style of work. Legassick traveled the world developing his style  of photography. During his travels, he found himself drawn to urban spaces. Legassick often uses multiple layering techniques to create a pencil drawing effect. The style of image, Leggassick creates, shows people and objects moving through time. He creates his images by using a long exposure time to create a motion blur effect.

This image (as seen below) shows the busy day to day life of a London train station. by setting his camera to a long exposure, Legassick has created a unique image of Waterloo station. in this upcoming week, i plan to take part in a studio workshop looking into motion blur. Whilst in the studio, i will investigate the way in which objects move through time, as seen in this image by Legassick.
grant_legassick_urban_etching_passangers_lead.jpg

Gjon Mili – Objects In Time

Objects In Time, Photo Object, Year 2

Gjon Mili is a well know photographer who works with long exposures. He is most famous pieces is his work with Picasso. Mili spent his career capturing long exposures in the studio working a long side Picasso to create beautiful light drawings. The method behind creating these photographs is using the camera to make long exposures. The photograph would have been taken in a dark studio with minimal lighting, during this time Picasso would have draw the vase using a light source. At some point during Picassos light painting Mili would have set off a single flash of light to capture Picasso in the background in the image.

The image is developed over a period of time, documenting the development of the image over time. This image by Mili shows the skill and elegance of Picasso’s creativity. This week in the studio I am going to be taking part in a workshop looking at Stroboscopic flash which is a simular studio set up to the one Mili would have used to create this famous image. I love the colour pallet this image presents, the warm glow of the light in which Picasso is painting with acts as a comforting night light in the darkness. Mili makes us as the viewer feel as if we are the canvas in which Picasso is painting onto. I want to create something simular in my stroboscopic flash workshop this week.

ARTISTS: PICASSO

Final Piece Development

Photo Object, Photo object test shoots, Photography As Object, Year 2

This is the first stage of the creation of my final collage piece. I am combining my own images taken in the studio with ones I have found in various magazines. My aim is to match the face of my models face, to other facial features I found in magazines. I experimented using different ways to attach the elements of the collage together. I played around with the construction of the images, for one of my images I chose to sow them together using black string. I manipulated the appearance of my own images by layering and matching them to ones I have found in magazines. The concept behind the project was to manipulate the way we see beauty, by putting models faces together I have created an inhuman being made up from other subjects of beauty.

The idea of taking the beauty of a model then manipulating that beauty by combining the models face with other subjects really interested me. Its the idea of two or more beautiful things not always having a beautiful outcome.

Object in Time- workshop

Objects In Time, Photo Object, Photo object test shoots, Year 2

Today I took part in a workshop looking at objects in time. In the workshop I used stroboscopic photography. Stroboscopic photography is a series of high intensity flashes, over a long exposure time. The results from producing photographs this way is a motion blur effect (as seen below). Every time a flash is let off the camera captures the models movement at the time of the flash, so over a two second exposure the model is captured moving multiple times. Stroboscopic Photography will set off a minimum of 10 flashes per second, creating the illusion that the model is moving through the photograph.

For this workshop I wanted to look at movement in both the model and objects. For this shoot I got my model to spin around with a long scarf during the time the camera made the exposure. The results I captured show the model moving through the photograph and give the illusion of moving image opposed to a still image. I was happy with the result I gained from the first half of the shoot, but I wanted to try something different for the second half of the shoot. Since researching Gjon Mili I loved the effect he created with his photograph of Picasso drawing a vase using just light. To create the same effect I used the flashlight from my phone, I increased the exposure on the camera to ten seconds, then started drawing while the stroboscopic flash system was going off.

The camera captured every movement I made with the flashlight, creating a light drawing. Me and the group I was working with then decided to make a group shot. To do this we all stood in front of the camera while the flash was going off, we then moved out of the way of the camera as soon as the flashes stopped. Then one person in my group then drew with a phone light in the position we were all standing in. The results from this shot are below with the rest of my images from the workshop. Overall I really enjoyed the workshop, I loved having the opportunity to work with such an advanced studio set up.

Experimentation-collage

Photo Object, Photo object test shoots, Photography As Object, Year 2

This is a collage I created using a number of different collage techniques. I combined; text, magazine images, book illustrations and my own images to create this experimental collage piece. Creating this piece really helped me decided which part of collage I wanted to use for my final piece. I wanted to combine lots of collage techniques so I c[could get a better idea of what looked visually pleasing and what aspects of the collage didn’t. completing this personal task has helped me decided what I want to achieve in my final collages. image00008

Annegret Soltau- Photo Object

Photo Object, Photo object research, Photography As Object, Year 2

Annegret Soltau is a well known collage artist who began her career in the 1970’s. Soltau discovered her love for art in her late teens, drawing was her way to escape from everyday life. Her early works include drawings of men and women merged into one being, it was an newspaper article about her work that triggered her to experiment with collage. A lot of the time Soltau used her own face to create the collages as people would get offended with her style of work. Soltau’s aim from her collage work was to create non-human shapes by merging different people and objects together into one ‘portrait’.

Soltau creates her famous images using her own photography, then sowing individual parts of her subjects faces on top of one another. The sowing effect is an aspect of Soltau’s work which adds to the eeriness of her final pieces. By sowing pieces of her photographs onto her other photographs Soltau creates alien beings. I love how Soltau combines different body objects so well, she is able to match certain features of peoples faces perfectly. In my final piece I am going to try different techniques to attach parts of my collages together, some of these will included sowing. By using other techniques to attach my collage together will hopefully give my work an edge.

Photogram Workshop- Photo Object

Photo Object, Photo object test shoots, Photography As Object, Year 2

Below are the results from my photogram workshop, I experimented with various objects to create these prints. Colour photograms take place in the colour dark room, I placed the light sensitive paper under the enlargers along with a selection of objects such as; rubber gloves, feathers and plants. Once I was happy with the arrangement of objects I then exposed the paper for 5 seconds and fed the exposed paper into the developing machine. Below is my results from the photogram workshop, overall I am happy with the results.


Cyanotype Workshop- Photo Object

Photo Object, Photo object test shoots, Photography As Object, Year 2

This week I took part in a darkroom workshop session looking at the process of cyanotypes. Cyanotype is an early form of photography put together in the black and white darkroom. Ferric Ammonium Citrate and Potassium Ferricyanide are mixed together with 100ml of water and formed into a liquid. Both chemical compounds are then poured into a container, it is important to mix the chemicals in a brown glass container so no light can get to the chemicals. After mixing all the chemicals needed I spread the mixture across some paper using and sponge. Once the mixture was on the paper I used a hair dryer to dry off any water.

The next stage was to add objects on top of the paper, I chose some stencils provided by the technical staff member. Once I was happy with the placement of the objects I then placed the objects and the paper into a concentrated light source for 10 to 20 minutes. Once the timer was done I then rinsed the print off in water, then put the finished print on the dryer. Below are my results from my cyanotype workshop. Overall I am happy with the way my cyanotypes came out. During this workshop I experimented with the timings of the exposure, I learnt that the longer I left the print in the light bed the darker and more defined the finished outcome would be. I would definitely consider working with cyanotype again, I enjoyed the practical side of process and seeing the variations of results.


Collage workshop- Photography as an object

Photo Object, Photo object test shoots, Photography As Object, Year 2

img_9753.jpgToday I took part in a collage workshop. I was asked to bring in some of my own photographs and any un-used magazines I had indoors. This was the perfect task for me because I am specialising in collage for this photo object unit. Above is my results from the workshop. I focused on a theme of people as I want to incorporate portraiture into my final piece. Overall I am happy with the outcome of this workshop, i managed to combine my own photographs with magazine cut outs to create with final outcome. The workshop got me thinking about how I can use my own photographs with existing ones to create a totally new outcome.

Mann Ray – Object and body

Object and Body, Photo Object, Year 2

Mann Ray is one of the most well known artists of all time, from his invention of the Rayograph to his famous collage work, Ray has a huge portfolio of amazing pieces of work. I chose to research Mann Ray in relation to object and body because of his work from 1936 photographing Dora Maar with an african mask. The idea of placing an object with the body is something fine artists and photographers have done for many years. Ray’s image from 1936 shows both object and body together, however the object is a mask with clear facial features, making the object a clear relation the body in the photograph. The mask is placed parallel to the models face, perhaps indicating the similar features or purpose of the model.

The model (Dora Maar) is laying with her head on the table with a lifeless look on her face in a some what similar to the expression on the mask. Mann Ray posed the model in such a way to possibly to point out the model could be replaced by an object. Both Marr and the mask have comparable qualities. By placing the model and the mask together could indicate to Ray’s vision of the future, replacing models with objects. The image by Ray could also point to models being treated as object and not as human beings. The second theory seems more likely as Ray would have had to been very ahead of his time to think of such a theory. Looking at Mann Ray’s image of Dora Maar from 1936 has helped in my research for this photo object unit.

This photograph along with Ray’s many other pieces of work has inspired me to consider using various different objects in the photo object unit. Since my final piece is going to be based around image manipulation/collage I will consider using objects to manipulate my images, either through the use of collage or in the raw photographs.